



Tooling Maintenance Checklist for Reliable Busbar Punching and Shearing
A clean hole and a square cut can make the rest of a busbar assembly feel effortless. When punching leaves burrs, shearing creates a rough edge, or holes drift slightly off position, the problem often begins long before the finished part reaches inspection. In many cases, the cause is tooling condition.
A busbar punching and shearing machine works under substantial force, especially when processing thick copper or aluminum. Punches, dies, blades, guides, and hydraulic connections all need regular attention. A disciplined maintenance routine protects part accuracy, reduces scrap, and helps operators avoid the frustrating surprise of a machine stopping in the middle of a production run.
This checklist is designed for practical use in panel-building workshops, distribution cabinet factories, and transformer manufacturing environments. It focuses on the components that most directly affect hole quality, cut quality, and safe daily operation.
Start Each Shift with a Quick Tooling Check
A daily inspection does not need to be complicated, but it should be consistent. Before processing the first copper or aluminum bar, remove dust, metal chips, and residue from the working area. Small pieces of scrap caught beneath a busbar can affect positioning; chips around the die opening can also mark the material or interfere with full punch travel.
Check the punch and die set visually. Look for chipped cutting edges, flattening around the punch tip, cracks, rust, or a bright polished area that suggests uneven contact. A good punch enters the material cleanly. If it begins to tear rather than shear, the resulting hole may have a heavy burr or an out-of-round edge.
- Confirm that the correct punch diameter and matching die are installed.
- Make sure retaining bolts, die holders, and clamps are fully secured.
- Check that the busbar support surface is clean and level.
- Inspect the foot switch and control response before beginning batch work.
- Listen for unusual hydraulic noise, vibration, or delayed return movement.
It is easy to dismiss a minor change in sound or feel when production is busy. Yet those early signs often point to loose tooling, insufficient lubrication, hydraulic pressure issues, or a component beginning to wear.
Keep Punches and Dies Matched, Centered, and Sharp
Tool alignment is the foundation of reliable punching. When a punch is not centered over its die, it experiences side loading during the stroke. This can damage the punch edge, distort the hole, accelerate wear on the die, and in severe cases cause punch breakage.
With the machine powered down and pressure released according to the operating procedure, inspect alignment by slowly bringing the punch toward the die without material in place. The punch should enter centrally without scraping the die edge. If it does not, stop and correct the setup rather than trying to compensate by manually shifting the busbar during production.
Tooling should also be selected for the material and job specification. Copper is softer but can produce sticky residue; aluminum may gall or pick up on tool surfaces. Clean the punch and die after a run, particularly when processing aluminum, and use a lubricant suitable for the material and tooling manufacturer’s guidance. Too much lubricant attracts debris, while too little increases friction and heat.
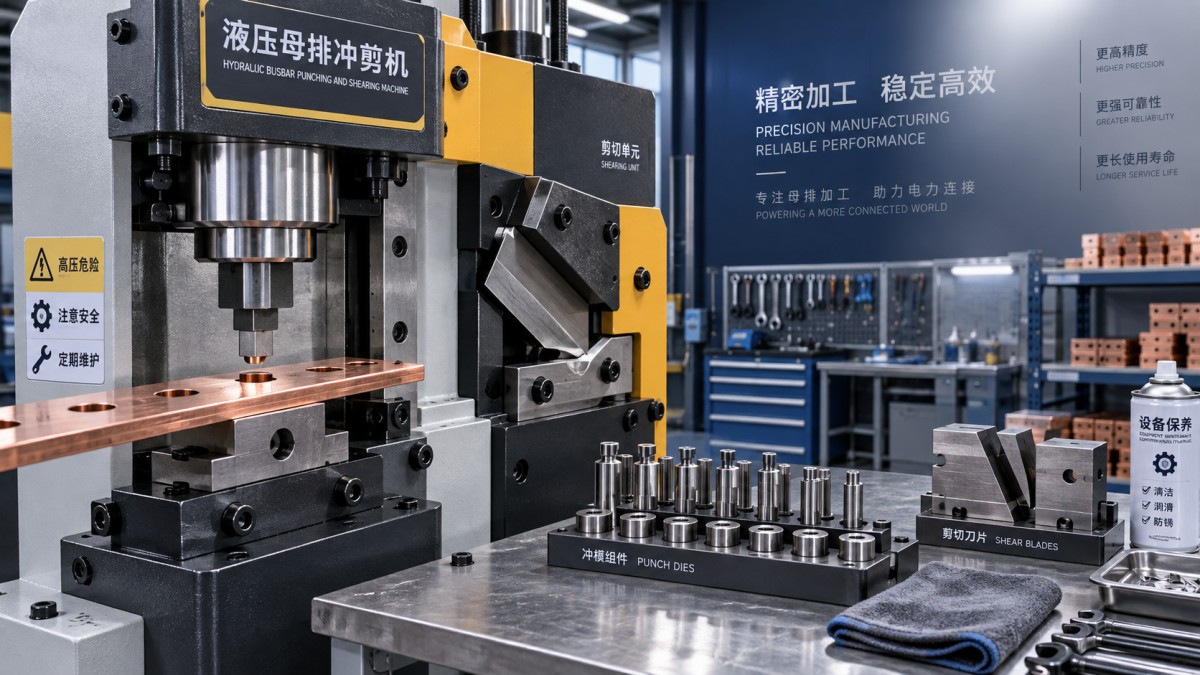
Sharpening is not merely a cosmetic maintenance step. Dull punch edges require more force and leave larger burrs. Likewise, a worn die opening can lose its clean shearing action. Keep a record of tool use, material thickness, and visible finish quality. This makes replacement or sharpening decisions based on real conditions rather than guesswork.
Do Not Treat Shearing Blades as “Set and Forget” Parts
Shearing blades are often blamed only when a cut becomes visibly poor, but their condition affects more than appearance. A worn or improperly adjusted blade can cause a slanted edge, excessive deformation, material drag, or a burr that requires manual finishing before assembly.
Inspect both the cutting edge and the blade mounting area. A blade that is sharp but not firmly seated will not produce a reliable result. Check for accumulated metal fragments behind the blade, loose fasteners, and signs of uneven wear along the cutting length. If one side wears faster than the other, investigate busbar support, blade clearance, and material feeding alignment.
For repeat jobs, examine several pieces from the beginning, middle, and end of the batch. This simple habit helps distinguish a one-off setup error from a gradual tooling problem. A clean edge throughout the run is usually a better indicator of machine health than a single acceptable sample.
Monitor Hydraulic Performance Alongside Tool Condition
Not every punching or shearing defect comes from the tooling itself. In a hydraulic machine, unstable pressure or slow cylinder movement can change how force reaches the punch, bender, or cutter. If the machine hesitates, loses power under load, or does not return smoothly, inspect the hydraulic system before continuing.
Review the hydraulic oil level and condition at the intervals specified in the machine manual. Look for leaks at hoses, fittings, cylinders, and valves. Keep the work area clean enough that fresh leakage is easy to notice. Darkened oil, contamination, or air in the system may affect repeatability and increase wear on internal components.
Machines with a built-in pressure gauge make daily monitoring more straightforward. For example, the DXJ-150 Hydraulic Busbar Bending Machine combines punching, cutting, and bending functions and includes a pressure gauge for real-time observation. Its punching output is rated at 31T, while cutting output reaches 15T. That capacity is useful only when the punch, die, cutter, and hydraulic circuit are maintained as a working system rather than as separate parts.
A Practical Weekly and Monthly Routine
Daily checks catch obvious problems. Weekly and monthly maintenance prevents the gradual decline that operators may not notice until scrap rates rise.
Weekly
- Clean tooling stations, die holders, guides, and chip collection areas thoroughly.
- Inspect punches and dies under good lighting for small cracks, edge damage, and galling.
- Check fasteners on tooling, guards, handles, and work supports.
- Lubricate approved moving points without contaminating the material contact surface.
- Test the emergency stop, foot switch, and normal return movement.
Monthly
- Review hydraulic hoses, connectors, seals, and oil condition.
- Verify punch-to-die alignment and cutter blade seating.
- Inspect electrical cables, plugs, and motor connections for damage or looseness.
- Check casters or machine positioning hardware if the unit is mobile.
- Update the tooling log with replacements, sharpening dates, and recurring quality concerns.
A tooling log may seem unnecessary for a small workshop, but it quickly becomes valuable when several operators use the same busbar punching and shearing machine. It creates continuity between shifts and prevents a worn tool from being repeatedly reinstalled because no one knows its history.
Common Symptoms and What They Usually Mean
Heavy burrs around holes: Start by checking punch sharpness, die wear, alignment, and whether the material is properly supported. Do not assume higher pressure will solve the issue; excessive force can worsen tool damage.
Oval, distorted, or offset holes: Inspect punch-to-die centering, clamping, and busbar positioning. Loose tooling or an unsupported workpiece can allow movement during the punch stroke.
Rough or angled shear cuts: Examine blade condition, blade clearance, mounting tightness, and the straightness of material feed. A dirty support bed can also tilt the bar enough to affect the edge.
Frequent punch breakage: Investigate alignment immediately. Confirm that punch and die sizes are correctly paired and that material thickness stays within the machine and tooling capacity. Never use a damaged punch simply because it still appears to work.
Slow or inconsistent operation: Check hydraulic oil, leaks, valves, electrical supply, and pressure behavior. The issue may not be visible at the tooling station, but continuing to operate can place unnecessary stress on punches and dies.
Protect Tools When They Are Not in Use
Tooling storage matters more than many operators expect. Keep punches and dies dry, labeled by size, and protected from impact. Avoid tossing them into an open drawer where edges can strike each other. A light protective oil may help prevent corrosion during storage, provided it is removed or controlled before use.
For equipment that supports standard and custom die sizes, organize each set so the punch, die, and associated hardware remain together. This reduces setup mistakes and saves time when a familiar job returns. The DXJ-150 model, for instance, can be supplied with standard punch dies from 7 mm to 20.5 mm, while custom mold sizes can be specified for different production requirements.
Maintenance Is Part of Finished-Part Quality
Reliable busbar processing is not achieved by force alone. It comes from clean tooling, correct alignment, stable hydraulic performance, and operators who respond early when cut or hole quality changes. A short inspection before each shift is far less disruptive than replacing broken tools or sorting a batch of inaccurate parts later.
Make the checklist visible near the machine, train every operator to recognize warning signs, and treat burrs or inconsistent cuts as useful feedback. With that routine in place, punching and shearing work becomes more predictable, safer, and easier to manage—whether the job involves a few custom copper bars or a continuous run of aluminum busbar components.
Send Us A Message
Get in Touch
*We respect your confidentiality and all information are protected.

First class quality service and professional after-sales team.